Backyard Waterfalls: Waterfall Landscaping Ideas for Your Back Yard
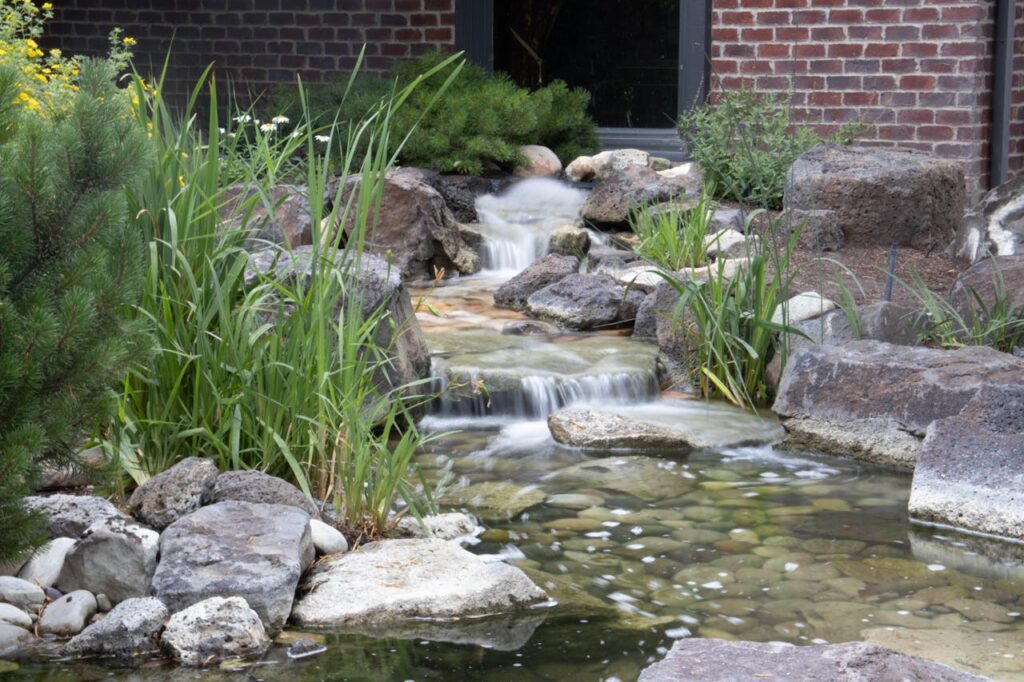
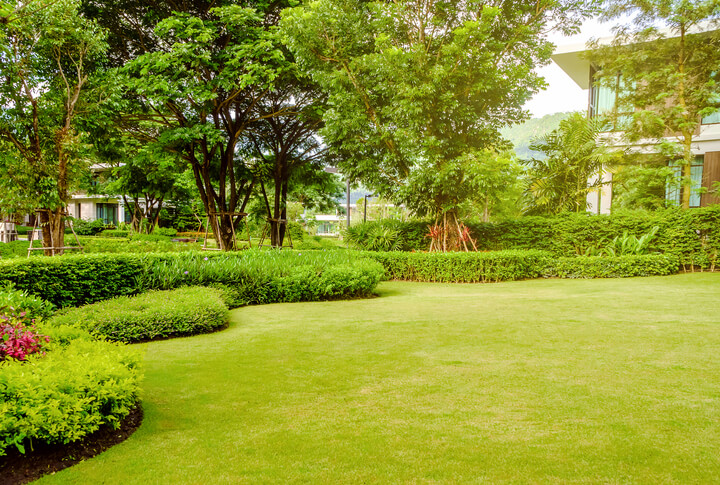
There are many different options when it comes to landscaping your yard. Choices vary from rockeries and fountains to trees, bushes, and more. These waterfall landscaping ideas for your backyard or as a feature point in any other areas of your home can greatly complement each other. Let’s look at some photos and general info of the possibilities available to you. 1. Waterfall Landscaping A waterfall is an attractive landscaping addition to any yard, whether you have a small or large amount of space available. Beautiful rockery siding, accompanied by a trickle of a cascading waterfall, and accented by colorful rocks would be a wonderful decoration that would provide an atmosphere of peaceful tranquility. 2. Landscaping with a Fountain Fountains can provide a very different look compared to waterfalls, and they are usually easy to install and maintain. Here are three choices for water landscaping ideas with fountains: A. Spouting Fountain The spouting fountain is a commonly chosen fountain because it provides a dramatic effect wherever you install it. It can be easily added as the installation process is simple and it only requires a submersible pump. It can be paired with a statue that you favor, or, if you would just like to make things simple, install a spouting statue. The ideas are endless. The fountain also has the option of spraying water in a certain pattern, such as a ring or bubble, which provides even more decorative options. B. Cascading Fountain Unlike the dramatic spouting fountain, the cascading fountain is more subtle. As opposed to using a pipe to spray water, this fountain is designed so that water spills down multiple levels, each one overflowing and pouring into the next. Cascading fountains can be found in a wide range of sizes in order to fit whatever the landscape design your waterfall landscape design requires. These fountains are easy to add because they are usually self-contained (everything needed is inside the unit). C. A Pondless Fountain Pondless fountains take up less space than other water features and may be the option for you. They draw their water from underground, and their base is usually made from non-traditional materials, such as an urn, column, or boulder. The pond or fountain is placed on a bed of gravel or another kind of rock that allows the water to drain to the reservoir underneath it, thus creating a look that differs from other kinds of fountains. Whether you choose to install a waterfall or a fountain in your yard, each will greatly enhance and add to the look of your rocky waterfall landscape. Are you looking for a garden landscape that you only see in photos? It’s a sign! You have come to the right place! If you have questions, require information, or would like to install some sort of rockery with a waterfall or fountain views in your yard, go ahead and sign up and contact us today!
Improve House Curb Appeal: Ideas for Small Homes with Gardens
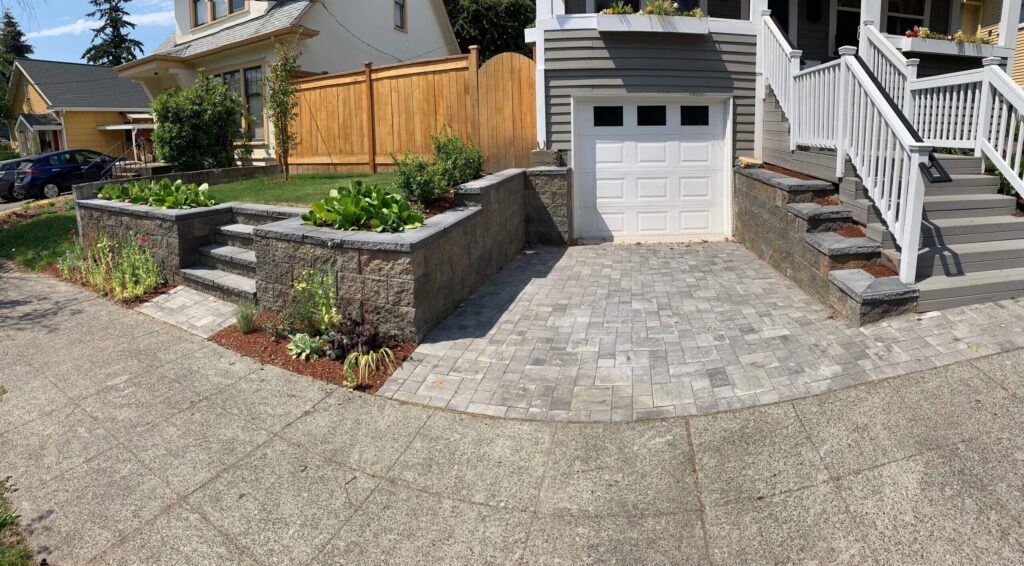
Do you have a small house that requires you to add curb appeal? Perhaps you’re having trouble distinguishing your home from the others on your street. The truth is that if you can’t improve your home’s curb appeal, you can miss out on prospective buyers, tenants, or visitors. First impressions are important, and the exterior of your home is the first thing visitors notice when approaching. The good news is that there are numerous simple home repair options that can improve the curb appeal of any size property that does not necessarily cost a lot of money. So, pay attention to our top tips to improve the look of your sidewalk, walkway, and the outside of your house. In this piece, we’ll look at some of the best ways to make your home a better home for as little money as possible, where possible. From a new mailbox to a new lick of paint or something simply to replace the light fixtures; can drastically improve the value of your house and make you competitive in the buyers’ market, if you are interested in selling your house. Why Is a Home’s Curb Appeal Important for Small Houses? Curb appeal is essential since it has a significant effect on a property’s overall impression, value, and as a result, the market asking price of your house. Your real estate agent will tell you the exact same thing. Better homes have lovely gardens. The first step towards creating a welcoming and lovely exterior is to evaluate your home’s curb appeal. When deciding how to improve your home’s curb appeal, consider it from the perspective of potential buyers or a real estate agent. Examine the outside of your home and make a list of any places that require attention. Is it time to re-paint your house, or replace the old roof with a new roof? Does anything require a thorough cleaning? Is there anything about the exterior of your house that should be improved? A splash of paint or something as simple as a new mailbox could make your house look more attractive. After you’ve evaluated the facade of your home, it’s time to determine its best features. This might be anything from a distinctive architectural design to a lovely tree in the front yard. These additions might help you increase the curb appeal of your home. From pulling weeds to clearing your driveway and upgrading the siding of your house – all these factors will increase buyers’ interest and sale potential. Door Hardware Can Add a Special Touch to Your Front Door & Front Porch Consider adding some comfortable outdoor furniture to your gorgeous front porch, for example, to make it more appealing. Better homes are always comfortable. If your property has a specific architectural style, consider adding some ornate hardware to the doorway of your front porch to accentuate its distinguishing elements. Overall, assessing your home’s curb appeal, recognizing its best aspects, and establishing a budget and timeframe are all critical elements in improving the curb appeal of your tiny house. You can build a welcoming and appealing home that will appeal to potential home buyers and add value to your property by taking a critical look at your home’s exterior and making smart improvements in its appearance. Improving your home’s curb appeal can make a huge impact on its overall appearance and value. A poorly kept or unsightly exterior, on the other hand, might detract from a property’s value and even discourage potential purchasers. Investing in curb appeal can therefore be a worthwhile and rewarding activity for homeowners. The Advantages of Increasing Curb Appeal to Create Better Homes Aside from enhancing the value of your home and attracting possible buyers, improving the curb appeal can also increase your pleasure of your property. A lovely facade can instill pride and happiness in homeowners while also improving the overall beauty of the area. Curb appeal can also make your home more desirable to guests, and it can even improve your social life by providing a welcoming area for outside meetings and events. By improving your home’s curb appeal, you can increase its financial value as well as its personal and social value. It is a worthwhile investment with both short and long-term rewards. Attracts Prospective Buyers A property with strong curb appeal looks good at first glance and set the tone for the rest of the home tour. It can give purchasers confidence in the property’s upkeep and maintenance, which can lead to a faster sale at a better price. Investing in curb appeal is a wise move for any homeowner trying to sell their home, and it can also create a sense of pride and delight in the appearance of your home for those who intend to stay for the long term. Boosts Neighborhood & Street Aesthetics Long-term advantages of selling your home include improving the attractiveness of the community. When your neighbors take pride in their homes and invest in curb appeal, the community as a whole becomes more desirable. This may result in increased demand for homes in the neighborhood and higher sale prices in the coming years. Enhances Home & Street Security Improving your home’s security is another significant advantage of improving curb appeal. You may dissuade criminals and make your property seem safer by investing in external light fixtures, cutting hedges and trees, and keeping the outside of your home clean and maintained. Finally, boosting the curb appeal of your home can simply make you happier and more content with it. A lovely façade can boost your sense of ownership and make you more eager to spend time outside. So, whether you intend to sell your property soon or simply want to enjoy it more, investing in curb appeal is a wise decision. How to Improve the Curb Appeal of a Small House Start With a Plan Assessing the curb appeal of the
English Garden Designs: Design & Style Ideas for Small Gardening Projects
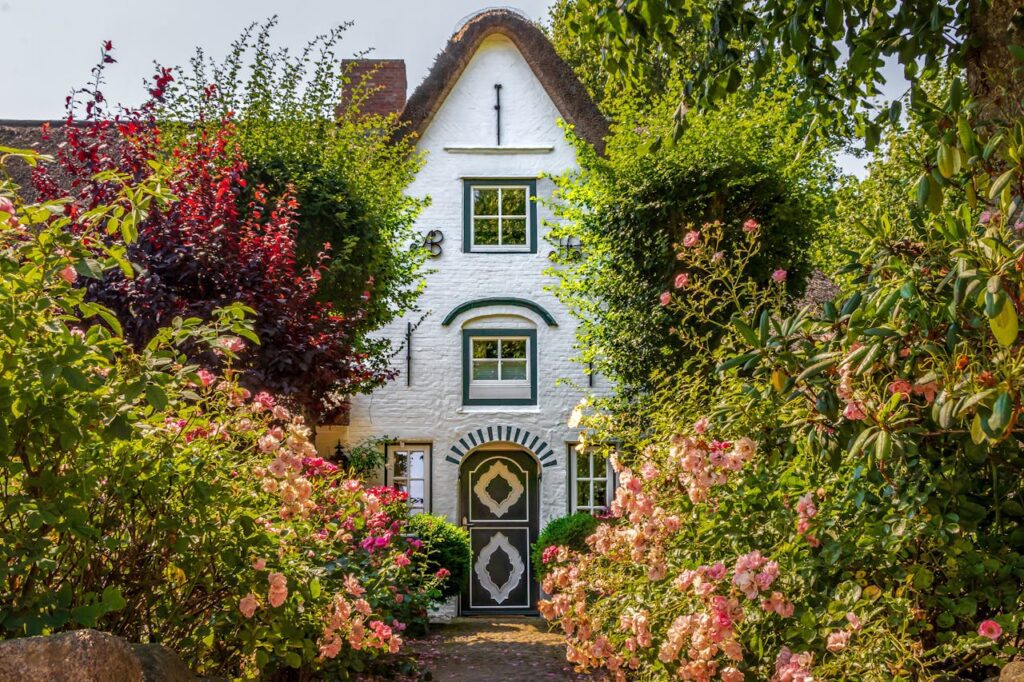
The English garden style is known for its rambling, old-world charm. Stony nooks and crannies are filled to bursting with foliage, and the requisite ramshackle grace allows mother nature to prosper. English gardens make strong use of shale walls, gravel, and stone pathways, rose arbors, and pots of herbs clustered around doorways. These gardens feature extensive use of rocks or stones along pathways and surrounding groups of plants within the garden. English Landscape Gardens The Origin of the English Rock Formal Gardens The traditional English country garden originates from the design of gardens around cottages in the 1800s. Just before the gardening reign of William Robertson. These gardens were required to be useful, they are not simply beautiful gardens. Because of this, English rock gardens are usually designed with a combination of ornamental and edible plants. Lush plantings from spring bulbs to fruit trees, and the various summer lush plantings and combinations for English gardens are absolutely endless. In fact, traditionally every plant grown in English country gardens was used either medicinally or for food. Quaint Space & Versatility The English rock garden depends on providing a sense of grace and charm, rather than impressing with a grand formal structure. Instead of properly trimmed bushes and precisely planted patterns of flowers, the rock garden will utilize vines such as ivy, runner beans, potato vines, or climbing roses that tumble over the shale old stone walls. These walls usually appear to be loose stone and function as retaining walls as well as accent pieces in English gardens. Stones Help To Manage Natural Growth English rock gardens tend to be small and dense, using informal design and traditional materials. Their size makes them a viable option for even the smallest of backyards. The stones helped to reduce the natural spread of growth, as well as reducing the necessity for extensive weeding. Stone pathways of coarse gravel or flat flagstones were used as they required little care and have a pretty appearance. These pathways were kept clear of weeds primarily by the consistent passing of feet. Various stones can be used in English gardens. Lush Plantings of Herbs Herbs are frequently placed in clay pots or in small garden patches right around the doorways, closely surrounded by heavy stones. Kitchen cooks may easily step outside and snip off a few leaves to use while cooking. Herbs that are also delicate are more likely to survive harsh winters as the warmth from the home will prevent them from dying of frost. The stones and clay pots also help to keep the herbs warm, allowing them to grow sooner in spring and last longer through the autumnal months. Traditional Plants: Herbs and flowering veggies, such as onions, sweet peas, and squashes from English Gardens Other traditional favorites include hollyhocks, yarrow, columbine, foxglove, crocus, climbing hydrangea, iris, dead and stinging nettles, lavender, poppy, sage, thyme, quince shrubs, tulips, bachelors buttons, bee balm, and peony. Easy Tending: The English cottage garden depends upon not require much maintenance. The densely planted surface area leaves little room for weeds, and the separations between them are protected by stones. This dense planting method may take some years to cultivate, especially if many annuals must be planted each spring. Primarily, however, perennials and seed heads that reseed themselves are used in such gardens to limit the necessity of heavy spring tending. Aged Beauty: The charm of the English garden is the feel of age that they have. Rose arbors and old stone walls, covered in ivy obviously will take some time to grow. You can contribute to the seeming age of the garden by introducing moss onto the rocks that border the paths, as well as training quick-growing vines over the retaining walls until the rose vines or ivy have grown larger. You can also help to create an illusion of an old garden by interspersing among each other. Perennials naturally try to take over the areas possessed by their neighboring plant species, eventually blending together into a seamless beautiful bed. As you’re planting, allow some bulbs or cuttings to spill over the borders into neighboring plant territories. (Do NOT do this with aggressive plants, or they will take over your garden!) Garden Stones English rock gardens will usually incorporate shale, limestone, and sandstone. The retaining walls are usually a range of grey stones from charcoal to light cream grey. Explore the enchanted world of the English garden with us as we enter a world of ageless and rustic elegance. This design captures the attention of viewers by using beautiful scenery, winding pathways, and rich vegetation that evokes elegance, charm, and inspiration. The charm of the English garden rests in its capacity to take us back in time, where organic rules and nature’s whimsy prevails. English Gardens To Fill Small Spaces English Gardens That Feel Like a Fantasy The English Garden is versatile and adaptable so it can be made to fit any area. You may create an outdoor haven bursting with old-world charm, whether you have a large yard or a small space. To change even the smallest outdoor spaces around, choose plant mixes, add focus points, and let your creativity go wild. A New Dawn For English Gardens Come along as we explore the mysteries of the English garden and show you how to make your own personal paradise. We’ll look at the components that make up this classic design, from rambling roses to brilliant bulbs, meandering paths, and fairytale landscapes. Allow the splendor of the English garden to spark your creativity. Many Gardeners Replicated Surrounding Landscapes The idea of a rock garden originated in the 18th century when English gardeners attempted to replicate the natural landscapes they had seen while traveling. They started using rocks and stone walls in their garden designs after being inspired by the rough topography of the Swiss Alps and the lovely backdrop of the Mediterranean. Plant Combinations Create A Useful
A Guide for Perfect Paver Installation
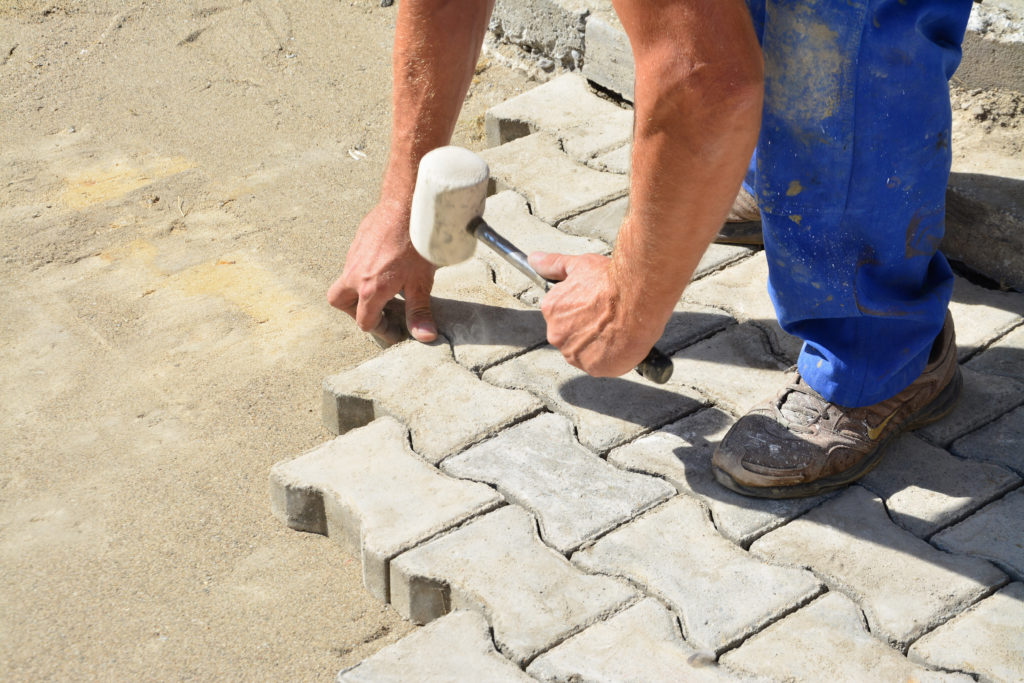
Pavers are an excellent choice if you want to create a beautiful driveway, walkway, patio, or pool deck. However, you will need to know how to lay pavers properly to achieve the desired results. Laying pavers is not difficult, but it requires patience and accuracy to ensure the best outcome. Here’s a quick guide on how to install pavers and how to lay a paver patio. How to Lay Pavers You can easily install pavers by following these steps: Prepare the Patio Area The paver installation process starts with measuring the area you want to pave to ensure you buy the correct amount of material. If the place to be paved touches your house, ensure that it slopes away from the home to promote proper rainwater drainage. Clear Out Grass and Soil Eliminate grass, soil, and other debris to ensure the ground is suitable for installing pavers. Consider tamping down the soil with a plate compactor to create a firm and level surface. Add Paver Base and Level with Sand Once the site preparation is complete, it’s time to lay the base material. You should apply the paver base to a thickness suitable for the intended use. Before laying the pavers, place a layer of bedding sand over the compacted base material to ensure a level surface for pavers installation. Place the Paver Stones Starting from the corner of your patio area, lay your paver stones while ensuring each piece lies flush with the others with a 2-4 mm gap. After laying an area of about a square meter, you need to level the top of the paver stones with a rubber mallet and a long timber board. If you need to cut some of the paver stones, you can use a masonry saw or angle grinder. You can rent any of this equipment if you do not have it. Add Paver Edging One of the most critical steps for laying pavers is adding edge restraints. These restraints lock the sub-base, base, and paver stones into place, preventing your pavers from shifting and separating. While wood and metal are the most commonly used as edge restraints in paver patio installation, you can also use concrete or plastic. Seal Pavers Sealing your pavers ensures they last longer, resist stains, and uphold their beauty. Failure to seal your pavers may expose them to mold buildup, erosion, weed growth, and discoloration. FAQ About Pavers Installation Now that you know how to install patio pavers and how to lay pavers in general, you may need answers to these common questions: Why should I consider Natural Stone Pavers? Natural stone pavers are more durable, aesthetically pleasing, and cost-effective than most paver materials. Where can I install Stone Pavers? You can install stone pavers on your patio, driveway, walkway, pool deck, or other exterior surfaces in your home. How long will my Natural Stone Pavers last? Natural stone pavers can last for more than 100 years if installed correctly. Conclusion If you find the task challenging even after learning how to lay patio pavers, the experts at New Life Rockeries can help. Contact us today at (206) 489-3734 for more information on how to lay pavers and get a free quote.
How to Lay Sod: A Complete Guide for a Greener Lawn
If you’re tired of watching grass grow from the ground, learning how to lay some sod is your most time and cost-efficient solution to creating a bed of greens instantaneously. At New Life Rockeries, questions about sod installation and peculiar requests for sod laying tips comprise a good chunk of our customer service calls. Landscapers and architects also call sod grass and turf. Sod is a grass that professionals harvest with its roots intact in a slim layer of topsoil that they then apply to front and back lawns. In this explainer, our professionals will detail how to plant sod grass the right way and which steps of the residential sod installation process would benefit from professional help. Measure Your Lawn Area Most sod vendors will require a measurement of your yard area in square feet before completing your order. Measure the width and length of your yard and determine how many sod rolls you need. Most sod rolls are 24 inches in length and 81 inches in height, and they’ll cover 13.5 square feet of yard space. Prepare The Soil Soil prep is a vital part of sod laying. Here’s how you do it. Clear your lawn of rocks, weeds, and debris Remove dead or old grass before rotor tilling Level your yard and establish a stable grade Put down mulch or compost at a rate of 29 square feet per thousand Rotor till the compost into the soil about six feet deep Lay Your SOD, Fill in Gaps Slightly wet the soil with a hose or sprinkler and erase your footprints with a rake. Unroll your sod and ensure that its topsoil layer makes complete contact with your yard. Start at the longest edge of your yard, laying down sod in a brick-wall arrangement without lapping the edges. Roll Out Your Lawn After laying sod, use a lightweight lawn roller to eliminate air pockets and ground the roots into the soil. Continue rolling until your feet no longer sink into the sod when walking over it. Give SOD a Good Soaking Irrigate your sod by immersing it about three inches deep in water, which will saturate the soil and keep your sod moist even in high temperatures. Advantages of Sod Sod offers more reliable growing success than seeds. Sod may be more expensive than seeds, but it has many times the growth and germination rates of fresh grass. Relatively weed-free establishment. If you remove all weeds from your lawn before laying sod, your grass can live weed-free lives for years without herbicide. Sod gives you an instantly green lawn. Learning how to lay a sod patch gives you the strategic advantage of transforming your lawn from a dirt-brown wasteland to a lush green paradise in one day. FAQs About Installing Sod Can I install sod over my pre-existing grass? No. New sod requires direct contact with the topsoil on your lawn to form new root systems. How much does a lawn roller cost? Lightweight poly lawn rollers cost $140 to $249. How long does it take for the sod to take root? Fresh sod takes at least 14 days to root. Setting your lawnmower to a higher-than-usual cutting height is the last step to laying sod. You don’t want to cut too close to its fledgling root systems. Contact Us Today and Learn How to Lay Sod the Right Way Planting sod requires careful planning and preparation to avoid wasting your investment on dead rolls of grass. In an age where people can move across states and sell their previous homes in a month, learning how to install sod grass can help thousands of people improve their curb appeal without spending a fortune on remodeling costs. Learn how to lay sod the right way by contacting New Life Rockeries today.
Water Garden Landscaping Ideas
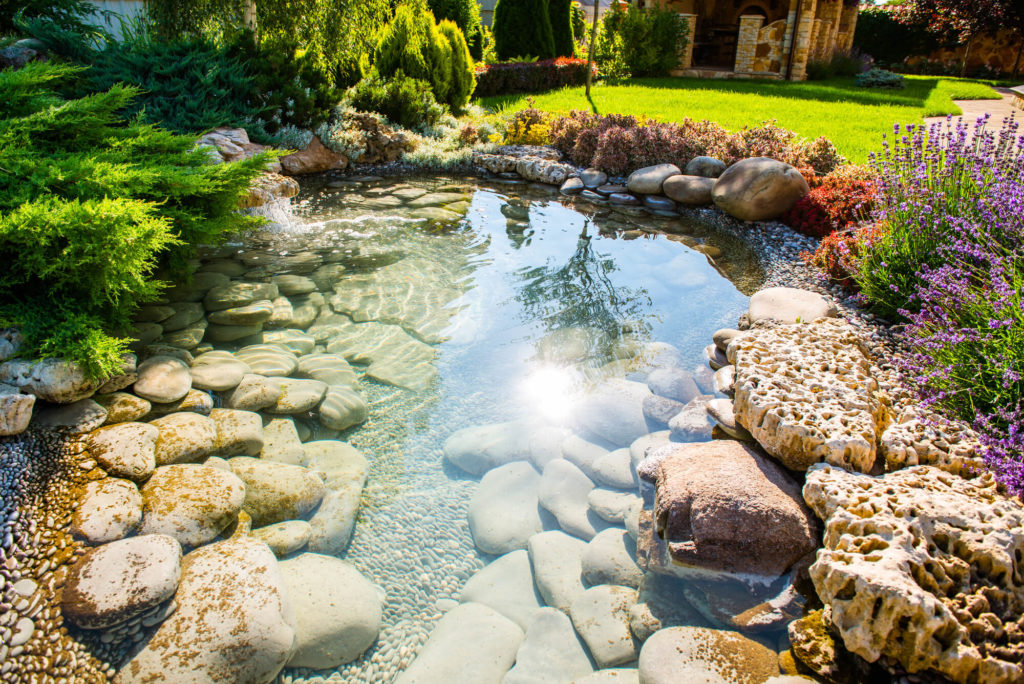
Do you admire water gardens and wonder how to get one in your home? A water landscape isn’t difficult to implement if you know how. In this post, we examine how to landscape with water providing the best water garden design ideas to suit your space and budget. What Is Water Garden Landscaping? Water gardening involves growing plants that thrive in rivers, lakes, and ponds. A water landscape can reach almost any depth or size. Typically, water landscaping includes submerged, floating, and edge plants such as American frogbit, water hyacinth, water lilies, and duckweed. Water Garden Landscaping Ideas Below are some excellent water garden ideas for your home. A Sloping Stream To achieve this most simple of pond decoration ideas, use visually unique plants and materials which gently move the eye downward. Excellent choices include ornamental grasses and weeping willow. Install different-sized boulders for edging the pond and add vibrant water lilies and black-eyed Susans for color and structure. Dressed-Up Fountain This distinctive water landscape includes paved landings and stone steps, lending formality to the central water feature—the fountain. Add ornamental grass, ivy, hydrangea, and other brightly colored plants to make the water garden pop against the stonework, along with bright purple lobelia in urns to create structure. Circle ‘Round This minimalist water feature highlights repetition with multiple circles unifying everything. Install a gravel path leading to a gently bubbling pond. Add plants such as liriope to echo the hardscape’s shape. Focus on the Fountain This garden waterfall design focuses on the fountain. Plant begonias and caladium to highlight the stonework. A topiary myrtle pair adds structural variety. Pond Perfect Place a simple bench or a table and chair overlooking an expansive, colorful lily pond. Add an arched bridge to welcome visitors to the water. Install various boulders around the pond’s edges for structure and visual interest. Japanese Garden Inspiration The Japanese initiated unique ponds landscaping ideas. Install this water landscape with prominent water features, a gurgling fountain, and an inviting bench to create your Asian-inspired getaway. Plant Japanese maple, rhododendron, and clumping bamboo for an authentic Zen feel; use steppingstones for access. Wonderful Waterfall Set shade-loving plants and evergreens around a backyard pond to create this water landscape. Use arborvitae as an evergreen softscape fence, stacked for edging and structure. Add a cascading water feature tumbling into a pond for visual and audio interest. Advantages of Water Garden Landscaping Key advantages of installing a water landscape include: Enhanced curb appeal and property value. Peaceful, relaxing atmosphere. Reduced outside noise, especially in the city. Excellent therapeutic tool: calms anxiety and lowers blood pressure. Increased harmony with nature through water sounds. Call Today to Get Your Free Quote! At New Life Rockeries, we have been helping homeowners in the Pacific Northwest improve their outdoor spaces with high-quality landscaping services for more than 35 years. Contact us to learn more about our landscaping contractor and water garden services. Let us help you implement desired Water Garden Landscaping Designs.
How to Install River Rock Landscaping
River rock landscaping are formed in the rushing waters of beaches, rivers, and streams. Here, we review how to install river rock landscaping to improve your garden or other outdoor space with unique ideas, such as river rock landscaping around a pool with rocks. River Rock Landscaping Ideas If you’re stumped for river rock landscaping ideas, these excellent tips should help you transform your garden. Make a Rock Garden of River Rocks How about using river rock as a base for a rock garden? As a ground cover, the varied hues of river rock contrast beautifully with plants like succulents or as river rock landscaping around trees with rocks. Build a Walking Path Front house river rock landscaping is ideal for creating elegant walking paths in your front garden. Spruce up Your Moon Garden White river rock landscaping catches the moonlight, creating extra shimmer. Encourage Good Drainage with a Dry Creek Bed Prevent waterlogging your plants and foundation by using backyard river rock landscaping to encourage drainage into the soil. Control Erosion Large river rock landscaping controls soil erosion by securing plants and soil. Design a Mosaic Front yard river rock landscaping creates a unique, inviting walking path. Mulch Your Flower Beds Don’t use plain old leaves, straw, or hay for mulch! Large river rock landscaping can help prevent erosion while beautifying your flowerbed. For more ideas that might suit your style, view our river rock landscaping photos. How to Install River Rock for Landscaping Use wooden stakes tied with string to map outplacement for river rocks. Shovel away loose soil and grass from the demarcated area. Tamp down the soil with a compactor. Spread 5 inches of fine gravel in the demarcated areas and tamp it down with the compactor. Place down sheeting, then pour sand 2 inches thick over the sheeting; leveling sand with a screed. Saw lumber in lengths suitable to fit your excavated area’s width, slide it into the soil evenly, and press the sand. Remove your wooden stakes and lay the river rocks, using the string as a guide, and pressing the rocks to secure them. Cost and Maintenance of River Rock Landscaping River rock landscaping is popular with homeowners because it’s beautiful, budget-friendly, and low maintenance, costing $0.05 – $0.35 per pound ($100 – $800 per ton). Advantages and Disadvantages of River Rock Landscaping Pros Doesn’t attract pests Improves drainage Highly durable Holds up well under foot traffic Lasts longer than mulch Low maintenance Saves you money Various color, shape, and size options Cons Overheats in the sun Leaves room for weeds to grow Provides no nutrients to the soil Sinks over time Contact Us Today for a Free Quote! Ready to transform your garden? Get in touch with New Life Rockeries today. Led by our founder Neil Eneix, we’ve been meeting the landscaping needs of Pacific Northwest residents for over 35 years. Contact us for general landscaping contractor and rockery installations that help you add lasting value to your home.
How to Install Landscape Lighting
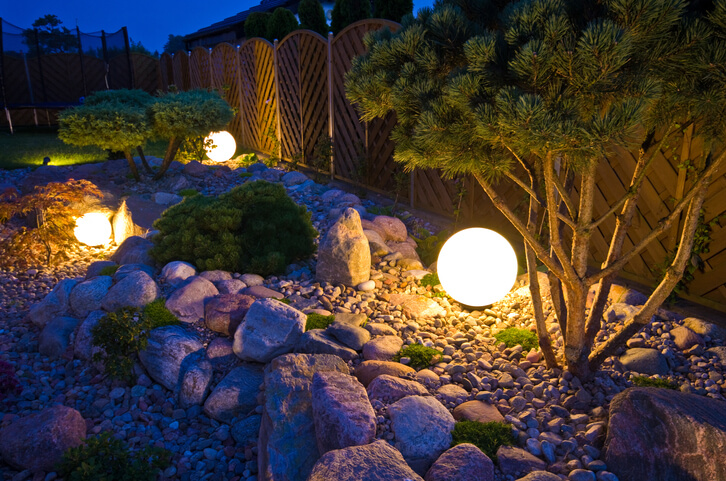
If you want to improve the nighttime curb appeal, add security, and create a magical outdoor space you and your family can enjoy, landscape lighting provides the best way to do it. How to install landscape lighting? Installing light fixtures is easy and doesn’t need any previous experience. Keep reading to learn more. Types of Outdoor Landscape Lighting You can easily find the best landscape lighting for your outdoor area because of the various types available. Spotlights: Lights that point in one direction Flood Lights: Used for brightening large areas Down or Up Lights: If you want to upgrade the outdoor design of your property, these lights make a great option. They can beautify your lawn or create patterns on walls. Step Lights: Work well for stairs, pathways or walls Garden Lights: Ideal to highlight beautiful plants and trees in your garden Bollard Lights: Can shine in various directions String Lights: Perfect if you want a more subtle light Which Is Best for Landscape Lighting Installation—DIY or a Professional Team When starting a home improvement project, a DIY approach may seem enticing, Just as homeowners consider various factors before embarking on landscape lighting installation, ensuring they make the most of their gaming journey. Functionality Using a professional for outdoor lighting can provide you with a landscape lighting design suitable for your property size and needs. A professional can envision how light will shine in your garden or backyard and the effect it will provide. Maintenance Even the best lighting fixtures require maintenance. Many things may cause your outdoor lighting to fail, which is why regular maintenance becomes necessary to ensure your system stays in tip-top shape. When professionals install traditional or smart landscape lighting, they can provide regular service to the system and fix any malfunctions. System Options If you install a lighting system yourself, you might go for solar landscape lighting. A solar lighting system is easy to install, but it depends significantly on sunlight, so it might not shine the way you want it. A professional can recommend the best landscape lighting option based on your preferences and budget. Cost and Maintenance of Landscape Lighting The cost and maintenance of landscape lighting depend on the type of lighting and the number of lights you want. A quality outdoor lighting system requires annual maintenance and costs between $500 and $5,000. Landscape Lighting Ideas Don’t have ideas for your outdoor lighting? No problem. We offer some that will give a new look to your exterior: Bright lights shining from fence edges Solar lanterns by the walkway Christmas lights along the fence Subtle lights hanging from the walls or arbors Small lights set in brick walls Garden lights set in rocks Landscape Lighting Near Me Now that you know “How to install landscape lighting,” are you ready to do it yourself, or do you need a landscape contractor professional help? If you are looking for a professional to help you install your favorite lights, look no further than New Life Rockeries. Contact us today at (866)512-7963 to get a free quote.
How Do You Make a Mortared Stone Wall
The simple mortared stone wall does more than setting boundaries in your garden or backyard—it spreads romance and sophistication. How do you make a mortared stone wall? Is it difficult to make a stone wall? Read this blog and learn how to build one for instant appeal. Materials and Tools Necessary for a Mortar Stone Wall A mortar and stone wall can make a casual and impressive statement, amaze your visitors and guests, and increase the value of your property. If you want to create a rock wall mortar, you will need to secure the following materials and tools: Materials Stone Stakes Limber for stakes 1½-inch screws Mortar Tools Level Line level Tape measure Mason’s trowel Mason’s line Chalk line Concave jointer Mortared Stone Wall Construction Methods: A Step-by-Step Guide With a bit of creativity, dedication, and free time, you can turn your ordinary entrance into an extraordinary mortar rock wall. Let’s consider the steps you need to do to create your mortared stone with retaining wall contractors: Step 1: Choose Appropriate Stones The first thing you need to do is select the right stones for your property. From semi-dressed to uncut rubble, you will find many options to choose from. Step 2: Divide the Stones and Apply Footing The next step involves dividing the stones into groups to ensure a perfect fit. Then, layout the site and add the footing. Take three to four feet of the stones and set them to the side. Next, add a layer of mortar for the rock wall on the footing. Step 3: Fill the Gaps If necessary, fill the gaps with smaller stones for a better look. Step 4: Level the Wall Height and Apply a Second Layer Once you complete the first course, use a mason’s line level to determine the height for the next course. When ready, apply a second layer with stones that sit ½ inch below the mason’s line. Step 5: Build the Wall Move the mason’s line up as you continue setting other layers to keep them at the same level. If possible, choose smooth and flat stones to create a perfect wall. When the mortar and stone wall is set up, clean off the excess with a brush. Mortaring a stone wall is a great way to update the look of your property. However, if you want your project to be successful, it is essential to plan the layout first, so square stones are at the corners and flat ones on the edges. Advantages of Mortared Stone Wall Adding a mortared stone wall at your entrance, garden, or backyard comes with numerous benefits: Increases the value of your property It is easy to clean and maintain Insulates your home from harsh weather conditions Ensures excellent thermal regulation It is durable and will last for years It is an eco-friendly and natural material Conclusion Now that you know more about “How do you make a mortared stone wall” and “How to use mortar for a stone wall,” it is time to roll up your sleeves and get down to work. If you need help, the experts from New Life Rockeries & Landscaping contractors are here to help. Contact us today at (866) 512-7963 to discuss your needs, and we’ll provide you with a free quote.
How To Make A Stone Walkway

A beautiful stone walkway is a rustic and inexpensive way to spruce up any home or yard. Stone paths fit any home aesthetic, from regency to cottagecore, and are much easier to install than other types of stone or concrete walkways. The sky’s the limit on how many stone walkway ideas you can come up with! Processes Involved in Making a Stone Walkway Making your natural stone walkway does not require as much hard work as other walkway types, but some preparation is necessary. Clear Out the Land and Excavate the Path First, you will need to clear out the space you want to work with. Remove any plants, roots, or other obstructions from your chosen area for your stone walkway. It is advised to mark the area with stakes or other markers. Apply Landscape Fabric and a Sand Layer To set up the foundation for your stone walkway, you will need to lay some landscape fabric down, ideally in a single piece. Once that is laid down, cover it in a layer of sand two inches thick. Make sure the sand is level, and use a spade to smooth it down if you have to. Lay Out and Level the Stones It is time to start laying out the stones. Lay them out along the path, ideally six to eight inches apart. Make sure they are all level and stick out above the sand. Fill with Pebbles and Install Edging Fill the gaps between stones with pebbles, and install some metal or plastic edging, if you wish. Materials and Tools Needed to Make a Stone Walkway Making a stone walkway may be less intensive than other projects, but you still need some specific tools. Required Materials to Make a Flagstone Walkway Before you start laying out your amazing stepping stone walkway ideas, you need to get the central components of your walkway. This can include: Flagstone Gravel Mulch or compost Potting Soil Sand Wallstone Your stones—flagstone and wall stone—are going to be the primary materials of your walkway. Potting soil and mulch or compost are there to help with the cover plants that you may put over your path. You need sand to lay down your stones, using gravel to fill in the gaps. Required Tools to Make a Flagstone Walkway Once you have your materials, you need to make sure you have the right tools. You need a level and a spade to make sure everything stays even, a wheelbarrow to move the stone around, and a rubber mallet for hammering the stones and marker spikes in. Benefits of a Stone Walkway Stone walkways not only look great, but they also add plenty of benefits to a home or yard, including: Improved aesthetic A feeling of cohesion in your yard Higher property value A safe walkway for family and pets Call New Life Rockeries for a New Beautiful Natural Stone Walkway Today! You can always build your stone walkway yourself, but nothing beats the professionals. Call us today at (866) 752-1283 if you want a gorgeous stone walkway that turns heads and makes your yard stand above the rest!