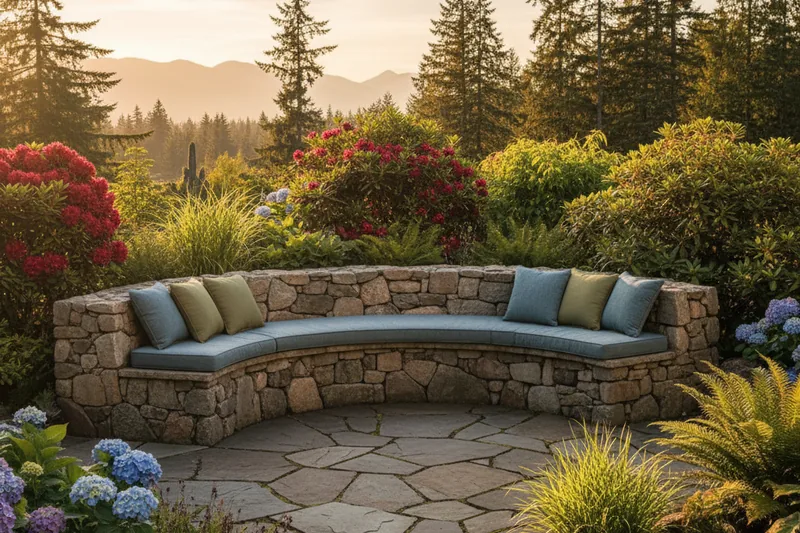
How To Build A Sitting Wall For Your Patio
A patio sitting wall is one of the most practical additions you can make to an outdoor living space. It defines the edge of a patio, doubles as seating for gatherings, and adds a finished, architectural look that loose plantings and fencing simply can't match. If you're planning to build one, here's what you need to know to do it right — from material selection through construction and finishing.
Planning Your Sitting Wall
Before breaking ground, spend time on the design. A sitting wall that looks great and functions well starts with a few key decisions:
- Height: The sweet spot for a comfortable sitting wall is 17–19 inches — roughly the height of a standard chair seat. Going below 16 inches feels too low; above 22 inches starts to feel more like a barrier than a seat.
- Width: A minimum of 12 inches is needed for structural stability. For a more comfortable seat, 14–16 inches is ideal. If you plan to add cushions, factor in the cushion thickness.
- Location: Position the wall where it naturally defines a space — along the perimeter of a patio, at the edge of a raised planting bed, or as a transition between two grade levels. Avoid placing it where it will block a natural traffic path.
- Material: Natural stone, concrete block, and brick are the most common choices. Natural stone (granite, basalt, or sandstone) gives the most organic look and ages beautifully in the Pacific Northwest climate. Concrete block is more affordable and easier to work with for DIYers. Brick offers a classic look but requires more precise mortar work.
Foundation and Construction
The most common mistake in DIY sitting wall projects is an inadequate foundation. A wall that shifts or settles unevenly will crack and become a tripping hazard. Follow these steps for a solid result:
- Excavate and compact: Dig a trench 6–8 inches deep and 2–4 inches wider than your wall on each side. Compact the base soil thoroughly.
- Gravel base: Add 4–6 inches of compacted crushed gravel (3/4-inch minus works well). This provides drainage and a stable, level base.
- First course: Lay your first course of stone or block partially below grade — at least 2–3 inches. This anchors the wall and prevents forward movement. Check for level in both directions before proceeding.
- Stagger joints: Each successive course should have joints offset from the course below by at least one-third of the block or stone length. This distributes load and prevents vertical crack lines.
- Capstone: The top course (capstone) is the most visible and the most important for comfort. Use flat, smooth stones or specially made cap blocks. Set them in mortar for a secure, finished surface.
Finishing Touches That Make a Difference
Once the wall is built, a few details elevate it from functional to genuinely attractive:
- Integrated lighting: Low-voltage LED lights set into the wall face or under the capstone create a warm ambiance in the evening and improve safety.
- Planting pockets: Leave small gaps in the wall face for creeping thyme, sedum, or other low-growing plants. These soften the wall's appearance and add seasonal color.
- Outdoor cushions: Weatherproof cushions in a neutral or complementary color make the wall genuinely comfortable for extended seating. Store them indoors during wet Pacific Northwest winters.
- Corner details: If your wall turns a corner, take extra care with the corner stones — they take the most stress and are the most visible. Use larger, interlocking stones at corners for both strength and appearance.
When to Call a Professional
A simple, low sitting wall on flat ground is a manageable DIY project for a handy homeowner. However, if your patio is on a slope, if the wall needs to double as a retaining wall, or if you want a natural stone look that requires fitting irregular stones, professional installation will save you significant time and frustration. New Life Rockeries builds patio sitting walls throughout King, Snohomish, and Skagit counties. See our hardscaping services or call 425-584-6878 to discuss your project.
Written by
Keith EneixCo-Owner, New Life Rockeries
Keith Eneix is a co-owner of New Life Rockeries alongside his brother Neil Eneix. He began helping with operations in 2007 and has been involved ever since. He writes from nearly two decades of hands-on experience with retaining walls, rockeries, and hardscaping across the greater Seattle area.
View full profile →Ready to Start Your Project?
New Life Rockeries has been building retaining walls, rockeries, and hardscaping across the greater Seattle area since 1975. Get your free estimate today.