The Post-Construction Lawn: A Guide to Sod Installation After Hardscaping
When a retaining wall, patio, or full backyard renovation is complete, most homeowners are left with one final question:
How do we restore the lawn and make everything look finished?
Sod installation is often the final step that transforms a construction site into a usable, clean, beautiful outdoor space. But installing sod after hardscaping is not the same as installing sod on untouched ground.
If you’re investing in New Life Rockeries
understanding how the lawn gets rebuilt afterward protects that investment.
This guide explains what happens to your soil during construction, how sod installation works afterward, what it costs, how long it takes, and how to choose the right contractor.
Why Lawns Struggle After Hardscaping
Hardscaping projects like retaining walls, patios, and drainage systems require excavation, grading, and heavy equipment. That process changes your yard in several important ways:
Soil gets compacted
Topsoil may be removed
Drainage patterns shift
Subsoil gets exposed
Debris may remain under the surface
If sod is installed directly on compacted or poorly prepared soil, it may:
Fail to root properly
Develop brown patches
Drain poorly
Separate at seams
Die within months
A successful post-construction lawn depends almost entirely on proper soil preparation.
What Is Sod Installation (In Plain English)?
Sod is pre-grown grass that is cut into rolls or squares with a thin layer of soil attached to its roots.
Instead of planting grass seed and waiting months, sod gives you:
An instant lawn
Immediate erosion control
Faster usability
Cleaner appearance
But sod is only as good as the base underneath it.
Step-by-Step: How Sod Installation Works After Hardscaping
1. Debris Removal and Final Cleanup
After wall or patio installation, crews should remove:
Rock fragments
Construction debris
Excess gravel
Concrete dust
Compacted fill soil
Skipping this step leads to uneven lawn surfaces later.
2. Regrading and Soil Preparation
This is the most critical stage.
Post-construction soil is usually compacted from machinery. That soil must be:
Loosened (typically 3–6 inches deep)
Regraded for proper slope and drainage
Blended with quality topsoil if needed
If drainage was installed during the wall build, it must be integrated properly into the new lawn grade. Poor grading can trap water behind walls and lead to long-term structural issues.
For a deeper look at how water pressure affects walls, see
In many backyards, proper lawn restoration also ties directly into effective drainage planning. You can review more about overall hardscape and landscape solutions here:
3. Soil Amendment
Depending on the soil condition, contractors may add:
Screened topsoil
Compost
Sand (in clay-heavy areas)
Starter fertilizer
After excavation-heavy projects, native soil rarely supports healthy root growth without improvement.
4. Final Grading and Leveling
Before sod is installed, the surface must be:
Smooth
Slightly sloped away from structures
Free of footprints
Lightly compacted (not hard-packed)
The final grade determines how professional the lawn looks — and how it drains long term.
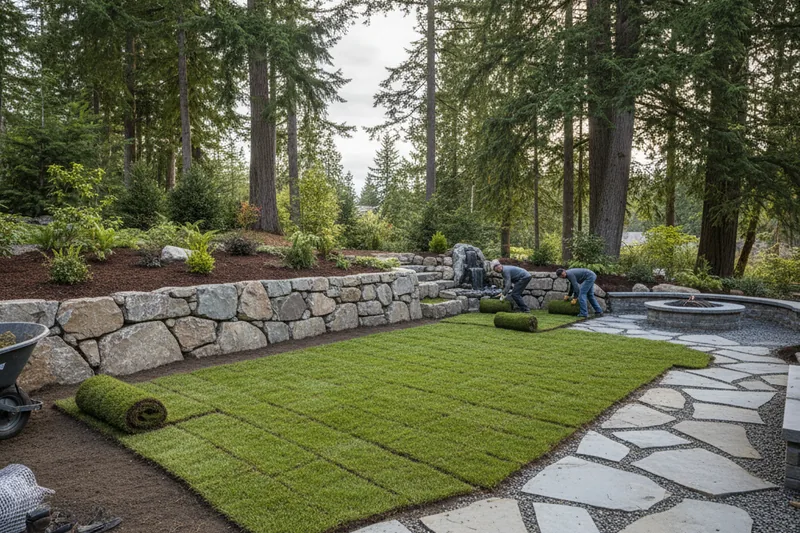
5. Sod Installation
Sod is laid tightly, staggered like brickwork to avoid long seam lines.
Crews then:
Roll the sod to remove air pockets
Water it immediately
Inspect for seam separation
Proper installation ensures the roots make full contact with the soil.
6. Watering and Root Establishment
The first 2–3 weeks are critical.
Typical watering schedule:
Days 1–7: 2–3 times daily
Weeks 2–3: Reduce gradually
Week 4+: Transition to deeper, less frequent watering
Roots usually establish within 2–3 weeks.
How Long Does Sod Installation Take After Hardscaping?
For most residential properties:
Soil prep: 1–2 days
Sod installation: 1 day
Full lawn usability: 3–4 weeks
If the hardscape project was large (multiple retaining walls, drainage systems, stairs, patios), prep may take longer.
You can see examples of large structural landscape projects here:
retaining wall cracks
Large structural changes almost always require careful lawn restoration afterward.
What Does Sod Installation Cost After Hardscaping?
Costs vary based on:
Size of lawn area
Amount of soil preparation required
Access for equipment
Type of sod selected
Drainage complexity
Typical Price Ranges
In most markets:
Basic sod installation: $1.50–$3.00 per sq ft
Heavy soil correction or regrading: $3.00–$6.00+ per sq ft
Post-construction lawns usually fall toward the higher end because of added prep work.
Sod vs Seed After Hardscaping: Which Is Better?
Sod Pros
Instant results
Faster erosion control
Less weed competition
Sod Cons
Higher upfront cost
Seed Pros
Lower material cost
Strong long-term root integration
Seed Cons
2–3 months to establish
Higher erosion risk
After major excavation, sod is usually the better option because soil stability is critical.
Common Mistakes Homeowners Make
Installing Sod Too Soon
If soil hasn’t settled after grading, uneven dips may appear later.
Skipping Soil Amendment
Construction soil is rarely lawn-ready.
Ignoring Compaction from Heavy Equipment
If large rocks were moved during the project, soil compaction may be significant. Learn more about how heavy stone impacts ground structure in this guide:
Written by
Keith EneixCo-Owner, New Life Rockeries
Keith Eneix is a co-owner of New Life Rockeries alongside his brother Neil Eneix. He began helping with operations in 2007 and has been involved ever since. He writes from nearly two decades of hands-on experience with retaining walls, rockeries, and hardscaping across the greater Seattle area.
View full profile →Ready to Start Your Project?
New Life Rockeries has been building retaining walls, rockeries, and hardscaping across the greater Seattle area since 1975. Get your free estimate today.