How Long Does a Retaining Wall Project Take? A Week-by-Week Breakdown
Building a retaining wall is not just a landscaping update; it is a structural construction project. Whether you are holding back a sloping hill, preventing soil erosion, or creating a flat area for a patio, the success of the wall depends entirely on the process used by your retaining wall contractors.
Homeowners often ask: “How long will my yard be a construction zone?”
The short answer is that a standard residential retaining wall (under 4 feet tall and 50 feet long) typically takes 3 to 5 days of active labor. However, large engineered walls or projects requiring complex permitting can take 2 to 4 weeks or more.
This guide covers the complete timeline, the “hidden” phases of planning, and exactly what happens on your property during installation.
The Short Answer: Estimated Timelines by Project Type
Before diving into the daily breakdown, here are the general time expectations based on the scope of the project. Note that these estimates cover active construction time and do not include the permitting phase.
- Small Garden Wall (Under 2ft tall): 1–2 Days
- Standard Residential Wall (3–4ft tall, up to 50ft long): 3–5 Days
- Large Structural Wall (Requires Engineering): 1–3 Weeks
- Terraced Walls (Multi-level): 1–2 Weeks
- Timber / Railroad Tie Walls: 2–4 Days
Phase 1: Planning and Permitting (1–4 Weeks)
The most common misconception is that the timeline starts when the excavator arrives. In reality, the most critical work happens before a shovel hits the ground. If you rush this phase, you risk long-term failure or legal issues.
Site Assessment and Design
A professional contractor must assess soil conditions, slope severity, and drainage patterns. Clay soil, for example, retains water and exerts more pressure on a wall than sandy soil. This assessment dictates the design, material choice, and reinforcement requirements.
Engineering Requirements
Most municipalities require a structural engineer to stamp plans for any wall over 4 feet high.
- The Process: An engineer calculates the “load” (weight of the earth) and specifies the necessary footing size and geogrid reinforcement.
- The Timeline: Engineering calculations and drawings usually take 1–2 weeks.
The Permitting Process
You generally cannot build a structural wall without a permit.
- Standard Permits: For smaller walls, approval might be over-the-counter or take a few days.
- Complex Permits: For walls requiring engineering or those near property lines/easements, approval can take 2–4 weeks depending on your local building department’s backlog.
Note: Never skip permitting. Unpermitted walls can be red-flagged by city inspectors, leading to fines and the requirement to tear the wall down.
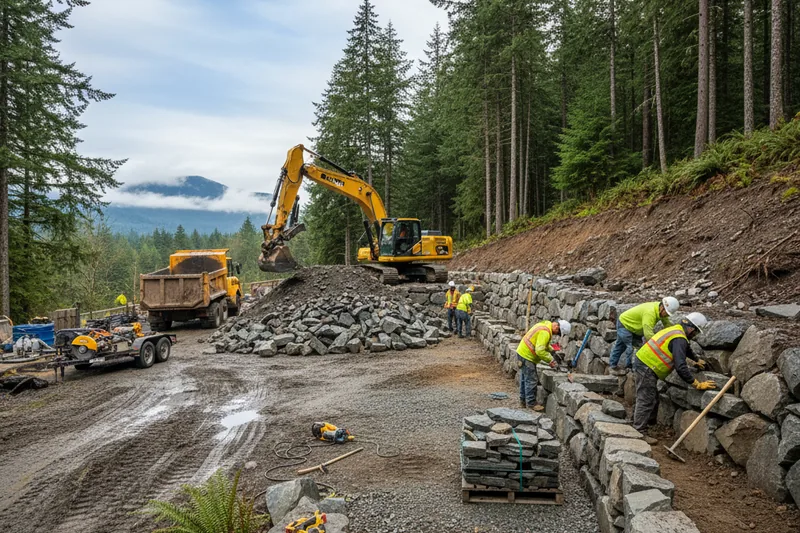
Phase 2: Site Preparation and Excavation (Day 1–2)
Once permits are in hand, the crew arrives. This is often the messiest phase of the project, involving heavy machinery and significant earthmoving.
Access and Staging
Heavy pallets of block, piles of gravel, and excavation equipment need space. The crew will lay down plywood or mats to protect your driveway and lawn, but expect heavy machinery traffic.
If you have large obstacles in the way, this is the time to remove them. For homeowners dealing with existing landscaping issues, understanding how to move large rocks and boulders is essential if the machinery cannot access the site easily.
Excavation and Grading
The crew digs out the area where the wall will sit. They aren’t just digging a hole; they are carving out the “cut” specifically to manage the slope.
- The Trench: They will dig a trench for the base material. A general rule of thumb is that the trench is buried 1 inch for every 1 foot of wall height (or a minimum of 6 inches).
- Soil Removal: Excavated soil that isn’t suitable for backfill (like heavy clay) must be hauled away.
Phase 3: The Base and Footing (Day 2–3)
This is the most critical stage. If the base is uneven or uncompacted, the wall will settle, crack, and eventually collapse. This settling is the primary reason homeowners eventually find themselves searching for information on retaining wall cracks and costly repairs.
Laying the Sub-Base
Contractors use a granular base material (often called “road base” or specific aggregate). This material compacts tightly to create a solid, non-shifting foundation.
Compaction
This is not done by simply stepping on the dirt. Crews use a vibratory plate compactor.
- They compact the soil before laying the gravel.
- They compact the gravel in “lifts” (layers) of 2–4 inches at a time.
- Why it matters: Proper compaction prevents the wall from sinking when it rains.
The Leveling Pad
The base must be perfectly level from left to right and front to back. Even a fraction of an inch off at the bottom will result in a wall that leans significantly by the time it reaches the top course.
Phase 4: Installation and Drainage (Day 3–5)
Now, the visible structure begins to take shape.
The First Course (The Bury Course)
The bottom row of blocks is usually partially or fully buried underground. This anchors the wall against the lateral pressure of the soil. This row takes the longest to install because every single block must be leveled individually.Installing the Drainage System
Water is the number one enemy of retaining walls. Hydrostatic pressure (water weight) building up behind the wall is the primary cause of failure.
- Drain Tile: A perforated pipe is placed directly behind the wall at the base level to carry water away to a suitable outlet.
- Clean Aggregate: The space immediately behind the blocks (at least 12 inches wide) is filled with clean, crushed stone—not dirt. This allows water to flow down to the pipe rather than pushing against the wall.
Stacking and Geogrid
As the wall goes up, crews stack the blocks and secure them (using pins, lips, or construction adhesive depending on the system).
If the wall requires Geogrid (a synthetic mesh fabric), it is placed between layers of block and extended back into the hillside. The soil is compacted on top of the grid, locking the wall into the earth. This effectively makes the soil mass and the wall one unified structure.
Capping the Wall
The final row is the “cap.” These blocks are purely aesthetic and seal the top of the wall. They are glued down with high-strength concrete adhesive.
Phase 5: Backfill and Restoration (Final Day)
Once the structure is complete, the area behind the wall is filled to the final grade.
Final Grading
The soil behind the wall should be graded to slope away from the wall (swale) or properly managed so surface water doesn’t pour over the top of the new structure.
Site Cleanup and Landscaping
The crew removes excess pallets, sweeps the staging area, and repairs any minor turf damage caused by the machinery. Many homeowners choose to follow this phase by planting softscapes to soften the look of the new stone, often aiming for a lush landscape design contractors aesthetic to integrate the hard wall into the natural environment.
Factors That Cause Delays
Even the best-planned projects can face interruptions. Here are the most common reasons your timeline might extend:
- Weather: You cannot compact wet soil. If it rains, the crew often has to wait for the site to dry out completely before resuming base work. Installing a wall on mud ensures failure.
- Unforeseen Soil Conditions: Hitting large boulders, bedrock, or buried debris (old foundations, stumps) during excavation requires extra time and equipment to remove.
- Material Shortages: Specific block colors or styles can occasionally be backordered by the manufacturer.
- Permit Revisions: If the city inspector requires a change to the plan during the initial inspection, work stops until the change is approved.
Common Materials: Pros, Cons, and Timeline Impact
The material you choose affects both the price and the installation speed. If you are budgeting for a project in the PNW, reviewing our guide on Retaining Wall Costs in Seattle will give you a specific idea of what to expect.
For example, a railroad tie retaining wall offers a faster timeline but a significantly different lifespan compared to concrete blocks.
Material
Durability
Installation Speed
Cost Estimate
Pros
Cons
Segmental Concrete Block (CMU)
High
Moderate
Moderate to High
Versatile, durable, wide range of styles
Can be labor-intensive, requires proper drainage
Natural Stone (Dry Stack or Mortared)
Very High
Slow
High
Aesthetic appeal, long lifespan, natural look
Expensive, requires skilled labor, heavy
Timber/Railroad Ties
Low to Moderate
Fast
Low to Moderate
Cost-effective, easy to install, rustic look
Shorter lifespan, can rot/decay, less durable
Poured Concrete
High
Moderate
Moderate to High
Very strong, versatile shapes, modern look
Requires forms, professional installation, less aesthetic flexibility
Gabion Walls
High
Fast
Moderate
Erosion control, modern industrial looks
Can look industrial, requires proper fill material
When is a Retaining Wall NOT a Good Fit?
While retaining walls solve many landscape issues, they aren’t always the right answer. You should reconsider or seek specialized geotechnical advice if:
- You are trying to stop a massive landslide: A standard retaining wall cannot stop a deep-seated slope failure. This requires soil nailing or extensive civil engineering.
- You have zero access: If a machine cannot get to the area, hand-digging increases labor costs and timelines exponentially.
- The wall is strictly for aesthetics but blocks drainage: Never build a wall that acts as a dam across a natural water runoff path.
Frequently Asked Questions
Can I install a retaining wall myself (DIY)?
You can DIY small garden walls (under 2 feet) that do not protect structures. However, for anything over 3 feet, the margin for error is slim. The physical labor of moving tons of gravel and block is exhausting, and without a laser level and compactor, the wall will likely fail within 3–5 years.
Do I need a permit for a 2-foot wall?
Usually, no. Most municipalities only require permits for walls over 4 feet. However, some have stricter rules (e.g., walls over 30 inches) or rules regarding walls near property lines. Always check your local codes.
Why is the quote so expensive for a short wall?
The cost is in the preparation, not just the blocks. Access, excavation, disposal of dirt, and the tons of imported gravel required for the base and drainage make up a significant portion of the cost. The blocks you see are only about 20-30% of the total project effort.
How do I find a reliable installer?
Look for companies that specialize specifically in hardscaping. If you are in the Pacific Northwest, looking specifically for retaining wall contractors specialists (or specialists in your local municipality) ensures they understand the specific local soil and drainage requirements.
Will heavy equipment ruin my driveway?
Contractors should use rubber-tracked machines and lay down plywood or protection mats to disperse weight. However, on older, thin asphalt driveways, minor scuffing or cracking is a risk that should be discussed beforehand.Ready to move from research to action?
New Life Rockeries has served the Seattle area for 50+ years. Get a free, no-obligation estimate from our team.
Get Your Free Estimate →
Written by
Keith EneixCo-Owner, New Life Rockeries
Keith Eneix is a co-owner of New Life Rockeries alongside his brother Neil Eneix. He began helping with operations in 2007 and has been involved ever since. He writes from nearly two decades of hands-on experience with retaining walls, rockeries, and hardscaping across the greater Seattle area.
View full profile →Ready to Start Your Project?
New Life Rockeries has been building retaining walls, rockeries, and hardscaping across the greater Seattle area since 1975. Get your free estimate today.